Are you tired of accidentally triggering SOS on your iPhone and want to learn how to turn it off? In this comprehensive guide, we’ll walk you through the steps to disable the SOS feature on your iPhone in 2023. Say goodbye to those unintentional distress calls!
Understanding SOS on iPhone
Before we dive into the process of turning off SOS, let’s briefly understand what it is. SOS on iPhone is a built-in emergency feature designed to help you quickly get in touch with emergency services when you need them the most. It’s a valuable safety feature that can be a lifesaver in critical situations.
“SOS” on iPhone stands for “Save Our Souls” or “Save Our Ship,” and it is commonly used as a distress signal in emergency situations. In the context of an iPhone, “iPhone SOS” refers to a feature that allows users to quickly and easily call for help or emergency assistance when needed.
The iPhone SOS feature is designed to ensure the safety of users in critical situations. When activated, it can:
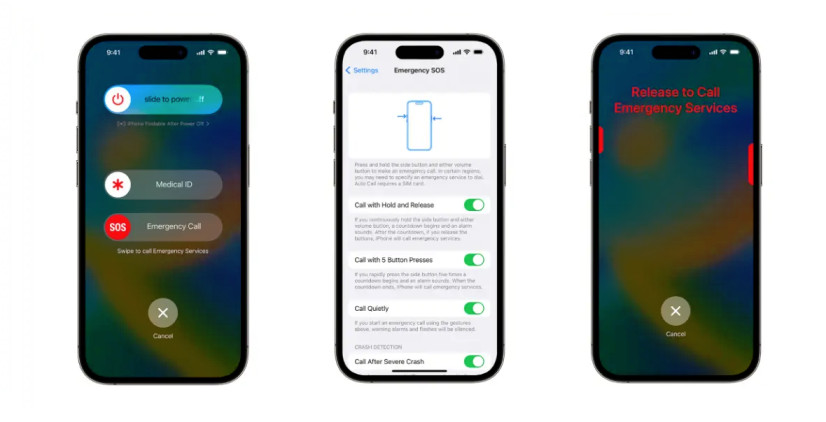
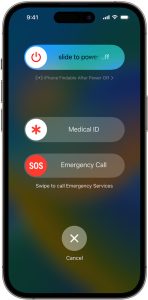
- Call Emergency Services: By pressing the side button (or the power button) on the iPhone rapidly multiple times, the device will automatically call the local emergency services number (e.g., 911 in the United States) or the equivalent emergency number in your region.
- Share Location: Simultaneously with the emergency call, the iPhone will send your current location to the emergency services, making it easier for them to locate and assist you.
- Alert Emergency Contacts: If you have configured your Medical ID in the Health app, your designated emergency contacts will receive a notification with your location information when you trigger SOS manually.
The iPhone SOS feature is a valuable tool for personal safety and can be especially useful in situations where you may be unable to dial emergency services manually. It’s important to use this feature responsibly and only in genuine emergency situations to ensure that help arrives promptly when needed.
Reasons to Turn Off SOS
While SOS is undoubtedly a useful feature, there are instances where you might want to turn it off temporarily or permanently:
1. Accidental Activation
One common reason is accidental activation. If you frequently find yourself accidentally triggering SOS, it can be frustrating. Disabling it can prevent unnecessary emergency calls.
2. Prank Calls
In some cases, mischievous individuals may attempt to prank you by repeatedly triggering your SOS feature. Turning it off can help you avoid these unwanted disturbances.
3. Privacy Concerns
For those concerned about their privacy, disabling SOS ensures that your location isn’t easily accessible in an emergency situation.
How to Disable SOS on iPhone
Now that you understand the reasons for turning off SOS, let’s get into the step-by-step guide on how to do it:
1. Open Settings
Begin by unlocking your iPhone and navigating to the “Settings” app. It’s usually represented by a gear icon.
2. Scroll Down and Tap on “Emergency SOS”
Scroll down within the Settings menu until you find “Emergency SOS.” Tap on it to access the SOS settings.
3. Disable “Auto Call”
Inside the Emergency SOS settings, you’ll find an option called “Auto Call.” This feature, when enabled, automatically calls emergency services when you rapidly press the side button multiple times.
Toggle off the “Auto Call” switch to disable this function.
4. Turn Off “Countdown Sound”
Just below “Auto Call,” you’ll find an option for “Countdown Sound.” This is the sound that plays when the SOS countdown is initiated. To turn it off, simply toggle the switch.
5. Customize Your SOS Contacts
While not necessary for disabling SOS, it’s a good idea to review and customize your SOS contacts. These are the people who will be notified when you trigger SOS manually. To do this, tap on “Set Up Emergency Contacts in Health.”
6. Disable “Call with Side Button”
Lastly, return to the previous screen and disable the “Call with Side Button” option. This will prevent emergency services from being called when you press the side button multiple times.
How Can Emergency Contacts Be Removed?
To remove emergency contacts from your iPhone, follow these steps:
- Open the Health App: Launch the “Health” app on your iPhone. It’s a white app icon with a red heart.
- Tap on Your Profile: In the bottom right corner of the Health app, you’ll see a silhouette icon representing your profile. Tap on it to access your health profile.
- Access Medical ID: Inside your health profile, you’ll see an option called “Medical ID.” Tap on it.
- Edit Medical ID: In the top right corner of the Medical ID screen, you’ll find an “Edit” button. Tap on it to enter edit mode.
- Remove Emergency Contacts: Scroll down to the “Emergency Contacts” section. Here, you’ll see the contacts you’ve added for emergency situations. To remove a contact, tap the red minus icon (-) next to their name. Confirm the removal if prompted.
- Save Changes: After you’ve removed the desired emergency contacts, scroll to the bottom of the screen and tap “Done” to save your changes.
Resolving the iPhone SOS Issue: Troubleshooting Guide
If you’re facing issues with the iPhone SOS feature or want to ensure it functions correctly, this troubleshooting guide will help you address any concerns. Let’s get started on fixing the SOS issue on your iPhone.
1. Check SOS Settings
a. Open Settings: First, unlock your iPhone and navigate to the “Settings” app.
b. Emergency SOS: Scroll down and tap on “Emergency SOS” to access the SOS settings.
c. Enable Auto Call: Ensure that “Auto Call” is enabled. This option allows your iPhone to automatically call emergency services when you rapidly press the side button.
d. Test SOS: Trigger a test SOS call by rapidly pressing the side button (or power button) multiple times. Confirm that it works as expected.
2. Update iOS
Outdated software can sometimes cause issues. To update your iPhone’s software:
a. Open Settings: Go to “Settings.”
b. General: Scroll down and tap “General.”
c. Software Update: If an update is available, you’ll see the “Software Update” option. Tap it and follow the on-screen instructions to update your iPhone.
3. Check Location Services
SOS relies on location services to send your location to emergency services. Make sure location services are enabled:
a. Open Settings: Access “Settings.”
b. Privacy: Scroll down and tap on “Privacy.”
c. Location Services: Ensure that “Location Services” is turned on.
d. SOS Settings: Scroll down and find “Emergency Services.” Ensure that location services are enabled for this feature.
4. Restart Your iPhone
A simple restart can resolve minor software glitches:
a. Restart: Press and hold the power button until the slider appears. Slide it to power off your iPhone. Wait a few seconds, then press the power button again to turn it back on.
5. Reset SOS Settings
If none of the above steps work, you can reset your SOS settings:
a. Open Settings: Access “Settings.”
b. Emergency SOS: Scroll down and tap on “Emergency SOS.”
c. Reset: At the bottom of the screen, you’ll find a “Reset” option. Tap it to reset your SOS settings to default.
6. Contact Apple Support
If you’ve tried all the above steps and still experience issues with the SOS feature on your iPhone, it’s advisable to reach out to Apple Support or visit an Apple Store for further assistance. There may be underlying hardware or software issues that require professional attention.
Ensuring that your iPhone’s SOS feature works correctly is crucial for your safety. By following these troubleshooting steps, you can address any problems you encounter and have peace of mind knowing that you can rely on this feature in emergencies.
FAQs
Certainly, here are some frequently asked questions (FAQs) about disabling the SOS feature on iPhone:
1. What is SOS on iPhone, and why would I want to disable it?
SOS on iPhone is a feature designed for emergency situations, allowing you to quickly call for help. You might want to disable it to prevent accidental activations, avoid prank calls, or address privacy concerns.
2. Can I temporarily disable SOS on my iPhone?
Yes, you can temporarily disable SOS by turning off the “Auto Call” feature in your iPhone’s settings. This allows you to keep the SOS function available but prevents it from automatically calling emergency services.
3. Will disabling SOS affect my ability to call 911 in an emergency?
No, disabling SOS does not affect your ability to dial 911 directly from your iPhone. You can always call 911 when needed, even with the SOS feature turned off.
4. How do I customize my emergency contacts on iPhone?
To customize your emergency contacts, go to the Health app, tap your profile, access Medical ID, and then tap “Edit.” Scroll down to the “Emergency Contacts” section, where you can add, edit, or remove contacts as needed.
5. Is there a way to turn off the SOS feature with the side button on my iPhone?
Yes, you can disable the “Call with Side Button” option in the Emergency SOS settings to prevent the side button from triggering SOS calls. This provides an extra layer of prevention against accidental activations.
6. Can I still manually trigger an SOS call if needed after disabling auto-call?
Yes, you can manually trigger an SOS call even after disabling auto-call. Just press and hold the side button and either volume button simultaneously, and the SOS slider will appear on your screen.
7. What other safety features should I be aware of on my iPhone?
In addition to SOS, iPhone offers features like Medical ID, which provides critical medical information to first responders. You should also familiarize yourself with your phone’s location-sharing settings and emergency dialing options to stay safe.
Remember that safety is paramount, and understanding your device‘s features can be invaluable in emergency situations. If you have any more questions or concerns about your iPhone’s safety features, don’t hesitate to explore your device’s settings or seek assistance from Apple support.
Conclusion
There you have it—a comprehensive guide on how to turn off SOS on your iPhone in 2023. Whether you’re looking to prevent accidental calls, avoid pranks, or address privacy concerns, following these steps will help you regain control over your device’s emergency features.
Remember, while disabling SOS can be beneficial in certain situations, it’s essential to weigh the pros and cons based on your specific needs. Stay safe, stay informed, and enjoy your iPhone without the worry of unintended emergency calls.


