What is MySQL Connector/ODBC?
MySQL Connector/ODBC is one of the ways to connect to a MySQL database. Access to the database is provided here via the industry-standard Open Database Connectivity API. MySQL Connector provides not only driver-manager-based interfaces to the MySQL database but a native one, with full Unicode compliance, transactions, and stored procedures inclusively.
MySQL Connector/ODBC is one of the ways to connect to a MySQL database. Access to the data source is provided here via the industry-standard ODBC API. MySQL Connector provides not only driver-manager-based interfaces to the MySQL database but a native one, with full Unicode compliance, transactions, and stored procedures inclusively. MySQL ODBC driver is free and has open-source which you can find on Github.
Further, we will use the MySQL Connector ODBC 8 which supports the latest MySQL 8. x databases.
MySQL Connector ODBC Download
Let’s start by downloading this MySQL Connector/ODBC 8 from the.
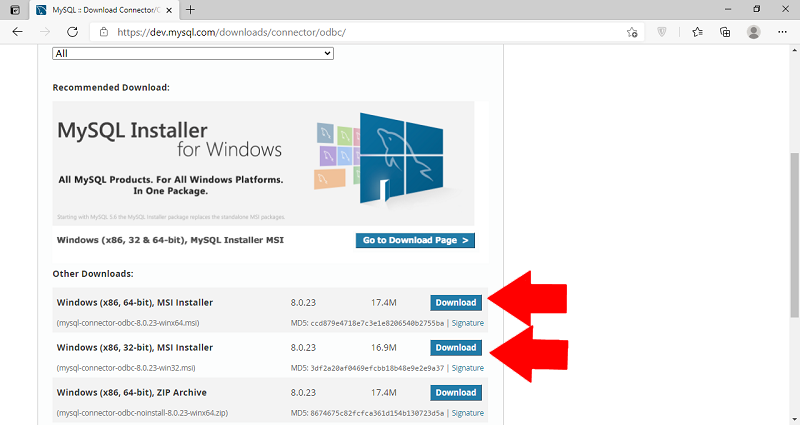
You have the option to download between 32 and 64-bit versions. Most modern hardware and operating systems are 64-bit already.. So, your obvious choice is to download the MySQL Connector/ODBC 8 64-bit. Unless you use older hardware or a 32-bit operating system, your best bet is the 64-bit version.
Figure 1 shows the screenshot of the download page. Pick the download button for the 64-bit version as indicated in the figure.
First, let’s download the MySQL Connector/ODBC 8 from the official site.
You have the option to download both 32 and 64-bit versions. Most modern hardware and operating systems are 64-bit already. MySQL Server database also installs under 64-bit so it’s best to use this version.
All you need is to click on the download button for the 64-bit version, as shown in Figure 1.

Another option is to install the 64-bit version of the OS. Then download the MSI installer for 64-bit Windows. Note the folder where you place the MSI installer. You will use it in the next section.
5 Steps on How to Install the MySQL Connector/ODBC
Now, to install the MySQL Connector/ODBC, you need to follow 5 simple steps. Let’s start.
STEP 1: Run the MSI Installer
Go to the folder where the MSI installer is located and double-click it. The filename should be “mysql-connector-odbc-8.0.28-winx64.msi” (the version at the time of writing is 8.0.28).
Click Next to proceed.
STEP 2: Accept the License Agreement
Before the actual installation begins, the installer needs some information confirmation from you. As software is under GPLv2, you need to accept the terms. Then click Next.

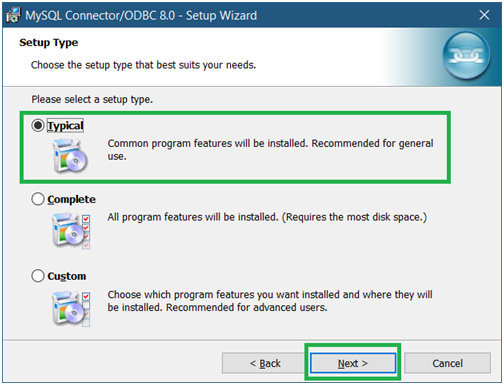
STEP 3: Select Between Typical, Complete, or Custom Setup Type
Select either Typical or Complete type. With Custom, you can change the installation folder. But that’s about it for custom installation. Then, click Next.
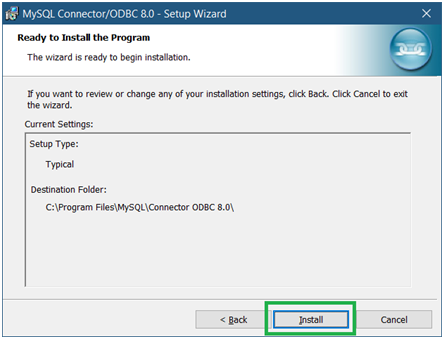
STEP 4: Click Install
At this point, you are ready to install. So, click Install.
After clicking the Install button, a prompt window will appear to ask if you want the app (installer) to make changes to your computer. Click Yes to proceed. Then, the installation will begin.
STEP 5. Click Finish
When the installation is completed, click Finish to close the installer.

The installation quick guide ends here. Now, let’s see how to use the MySQL ODBC driver to configure the MySQL data source.
How to Use MySQL Connector/ODBC?
To configure a data source, complete the following 5 steps.
STEP 1: Create a User for MySQL Database Access
You can skip this step if you want to use an existing user or the root user. In this example, we will use the Sakila sample database.
Now, using your favorite MySQL administration tool, create a user. Then, grant it access to the Sakila database on the local server.
Check the SQL code below on how to do this:
The code is straightforward about what we intend to do.
Now, you are ready to use this in the data source configuration.
STEP 2: Open the ODBC Data Source (64-bit)
Using Windows Search, type ODBC Data Sources and press Enter to open the ODBC Data Source Administrator (64-bit).

You can also run this application from the Windows Start / All Apps / Windows Administrative Tools.

STEP 3: Create a Data Source Name (DSN)
When opening the ODBC Data Sources (64-bit) app, you have the option to create between User, System, or File DSN.
User DSN is for one Windows user or account. This is also visible to the account that created the DSN. Meanwhile, System DSNs are visible to any user who logs on to a Windows PC. However, file DSNs are stored in a file so that they can also be copied to other Windows workstations.
For our example, we will use a System DSN.
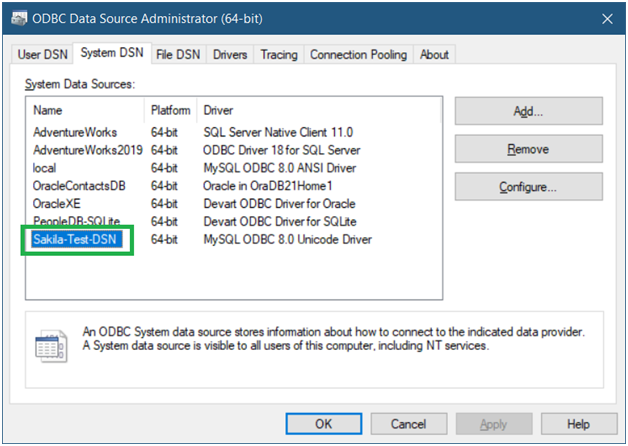
Figure 8 shows several already configured system DSNs. To start creating a new System DSN, click Add.

STEP 4: Select a MySQL ODBC 8.0 Driver
In the appeared window, you will see 2 MySQL ODBC options: MySQL ODBC 8.0 ANSI Driver and MySQL ODBC 8.0 Unicode Driver.
Choose Unicode if your database supports storing non-English characters. This can be Japanese, Arabic, Greek, or Ukrainian. If not, choose ANSI.
In our example, we will use Unicode. Sakila also supports storing Unicode characters.
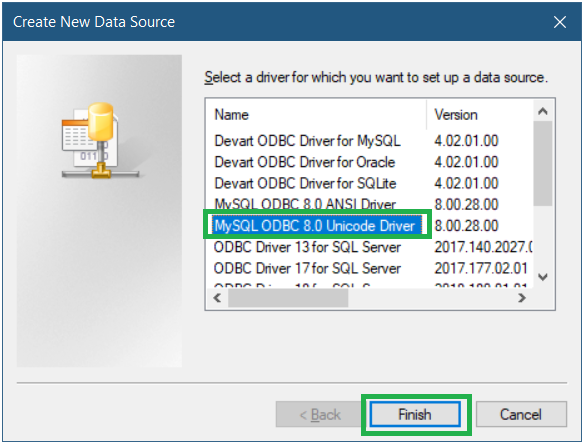
After selecting an appropriate driver, click Finish.
STEP 5. Name and Configure Your MySQL Data Source

So, in figure 10 a basic configuration is shown. Here you need to specify the data source name, server, port, user name, password, and database name. You can name the data source based on the purpose, database name, or system name. In this case, we used Sakila-Test-DSN. The server used is a local workstation, so, it’s localhost.
Localhost is also the default. If you leave it blank, the test connection will still succeed. The port 3306 we used is the default MySQL database port. Note that we also used the credentials granted on the sakila database in Step 1.
To test the connectivity, click the Test button. A “Connection Successful” message should appear. But if Step 1 is not done earlier, you will see a “Connection Failed” message.
To accept this configuration, click Ok.
To see the extra configuration options, click the Details button. See Figure 11

When going to the Details, you will see more options for connection, metadata, debugging, etc. For more information about these options, refer to the official documentation.
Click Ok to save the configuration. After that, it will appear in the System DSNs list.
Examples of Using MySQL Connector/ODBC Driver
You can test your installed MySQL Connector/ODBC further by using it in code and apps that support it. Let’s look at two examples.
Using the MySQL Connector/ODBC in .Net
Let’s use C# code and see if something is wrong with our configuration earlier. The configuration we are referring to is in Figure 10.
Notice that we used the DSN we created (Sakila-Test-DSN) in the connection string. The SQL statement used is a batch of INSERT statements to the actor table. See Figure 13.

It didn’t work. It appears to be a syntax error. But try to execute the same SQL statements in MySQL Workbench or dbForge Studio for MySQL. The code will work.
So, what’s the problem?
The error says it’s in line 5. But line 5 is the second INSERT statement. And we know there’s nothing wrong with it. The error is also not too descriptive.
So, it’s not about the code, it’s about the DSN configuration. Check out Figure 11 again. And notice the Allow Multiple Statements checkbox. It isn’t checked. But in our code, we used multiple statements run in a batch.
Let’s edit the configuration by clicking the Sakila-Test-DSN in the System DSN list and then Configure (Figure 12). Then check its box and click OK to save it. When you run the code again, the error will disappear and a success message box will appear.
So, the point is that a basic DSN configuration might not be enough. You must adjust the configuration based on your need.
Using the MySQL ODBC DSN in Power BI
In addition to using the MySQL Connector/ODBC DSN in coding, you can also use it in applications, for example, in Power BI.
In this case, a basic DSN configuration will do. So, let’s do the following steps:
- Open the PowerBI tool.
- On the welcome window, click Get Data. A window allowing you to select the data type will appear.
- In the search box, type ODBC. The list of data sources will be filtered.
- Select ODBC in the list box and click Connect.

- The From ODBC dialog will appear. Select Sakila-Test-DSN from the drop-down list and click Ok.

- Now, you can expand the Sakila database to see the list of tables.
- Check the required tables and click Load to view their data.

Conclusion
Summing up, it should be said that MySQL Connector/ODBC is quite simply not only when it’s installed on the machine but also when connecting to a database. There are no complicated steps – you just need to follow the installation wizard instructions, and further steps for connection can be easily remembered and act intuitively in the future.
There are many different ODBC drivers for databases. Devart company is a reliable vendor of award-winning high-performance ODBC drivers that are available not only for MySQL but for SQL Server, Oracle, PostgreSQL, MongoDB, and many others. There are also ODBC drivers for cloud platforms like SalesForce, Dynamics 365, and more.


